I want to make a natural lighting source like in the help video’s example for blending, but am unable to replicate the same results. I searched up in the forum and found a post made 4 years ago (Can someone make a Flowlab lighting example?), where it says to "Make an orange circle object (or your light color) (non-solid), make it slightly transparent using the Alpha behavior, and change the Blending mode (using the Blending behavior).
At last, change the object’ layer." What does change the object’s layer mean?
The Object Layer or display Layer should be on the Objects Property tab when you click on Edit after selecting an object.
By default, it should be at 1 and if there are other objects at the same layer, it can overlap and most of the time be put behind the other objects, so it won’t be visible.
Aso, it might help if you share your game so we can take a better look at what you are trying to accomplish since there are a few different ways at making light mechanics.
oh thats what it was refering to. But I tried everything from the example but it still doesn’t work. Heres my code (Game link: Flowlab Game Creator - Endless zombies):
Can I ask what the light is for? Is it supposed to be like an explosion or the firing of a gun sort of effect? Or is it supposed to be a permanent light source?
You could always use an Ease that goes from 80 to 0 so the transparency will go from 80% to 0% in whatever time frame in seconds you want. Typically for gunfire is more of a very quick flash of light, so I would recommend like 0.2 of a second for something like that.
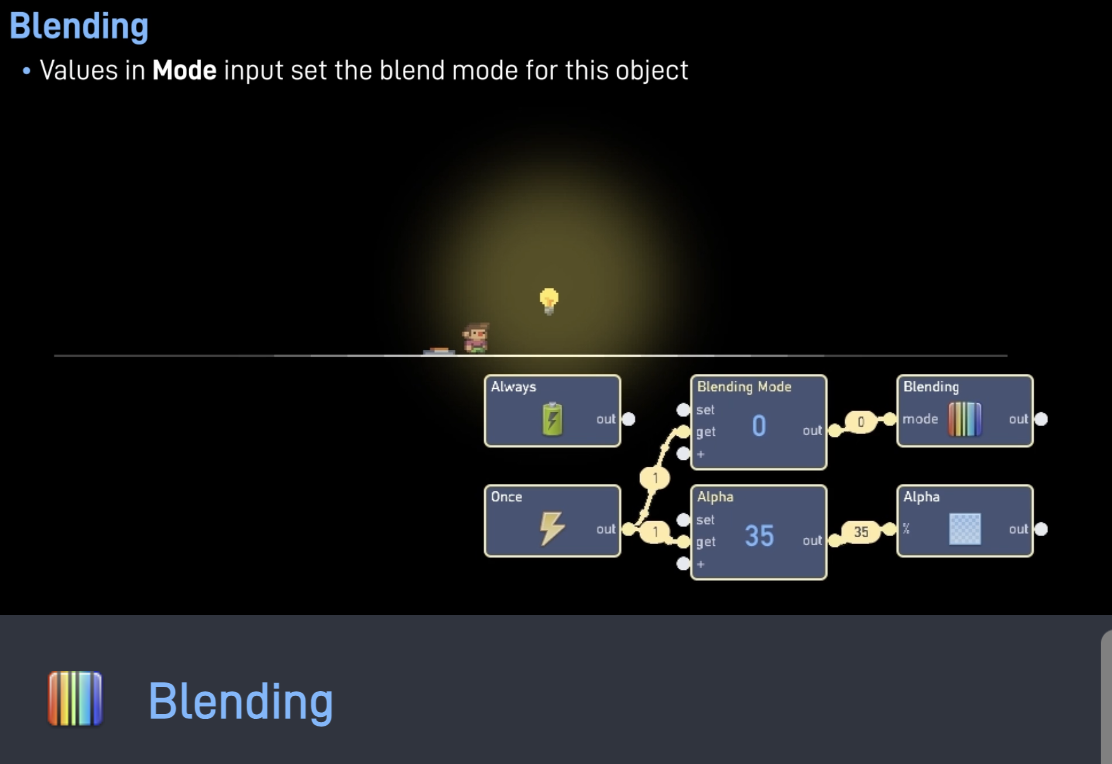
Its supposed to be permanent, just for the atmosphere. What I meant by gradient was the centre was more solid and bright and it decreased in transparency the farther it was from the center. Example from the blending help page:
Someone asked for this on a separate discussion, and I was able to find a website to create custom gradients like this. I was able to generate a simple white gradient, which you can probably turn it yellow using the RGB behavior.
I don’t really know myself; I usually play around with it until it does change, but typically it’s supposed to blend the object or smooth it out compared to the objects around it.
Here’s one I was able to make, you should be able to download this image and import it onto flowlab if this is what you need.
Blending basically helps transparent “auras” render better in the game.
0 is basic, so it just smooths it out better compared to the rest of the game, and makes it seem more like a light than a transparent circle.
1 will probably appear very similar since it will add that color onto objects that are within it’s sprite.
2 will subtract that color from any objects within the sprite, so it’ll actually take the yellow out of objects and probably make them more purple.
And I’m still not quite sure what Multiply does, but I think it’s similar to Add but will multiply the yellow hues in objects so they are much more stronger.
And I have no clue what Screen does, unless if effects everything regardless of the display order.
I could be wrong on most of these, since I usually only mess with 0 and 1 and I have never used the rest, but that’s about all I could answer with.