 Sprite Sandwich - A guide to spritestacking
 What is this guide?
Sprite sandwich is a guide I wrote on the internet with the intent on teaching flowlab users and the internet how to spritestack. When Witch in the woods was made, I thought spritestacking was a super hard mathematical feat, but I ended up being pleasantly surprised to be wrong when I attempted spritestacking for the first time and found how easy it was.
Because flowlab is such a simplified and easy to read programming “language”, I’m also sharing this around on the internet, and I encourage you to do so as well. Of course, any feedback is very much appreciated!
Why spritestack?
Spritestacking is a way to create top-down visuals in a 2D game engine. It is the only easy way to make 3D looking objects in 2D only engines, you can use it to impress friends that don’t know how to do it, it is in most cases more comfy than 3D models on your computer, and geometric complexity doesn’t increase computer strain unlike 3D models. The catch, of course, is that unless you get really advanced, you cannot create a lighting system akin to a regular 3D game.
Chapters
This guide is divided into three chapters so readers can digest what they need to, and nothing more.
 Chapter 0: Skin objects!
This chapters covers what it means to have an object in a game with a sprite object and a hitbox object.
If you have ever made a game where the hitbox and the sprite are two separate objects posing as one entity, you can skip this chapter.
 Chapter 1: How to spritestack!
This chapter covers what a spritestack is and how to execute one.
If you have spritestacked before, you can skip this chapter.
 Chapter 2: Spritestacking tips!
This chapter covers ways you can make your sprite stack more efficient, better looking, and ways to animate.
I recommend making a few spritestacks before you read this segment.
Chapter 0: Skin objects!
Creating hitboxes independent from sprites.

0.1: Skin objects?
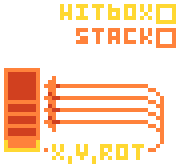
The term takes different forms, but in this guide a skin object means an object that serves as the visual sprite for another one. Meanwhile, the other object is a hitbox object, which stores the physics settings, hitbox, and all the rest of the code of the object.
![]()
For example, you can create a wizard player, but you may not be happy with any of the hitbox settings flowlab provides. So you would convert the wizard into a generic shape, and add a second object that acts as the wizard’s sprite. The skin object has no physics settings or hitboxes, but it follows the original wizard object.

This allows you to make the hitbox of an entity whatever you see fit, without having to worry about how the engine draws your entity’s hitboxes based on the sprite you draw.
0.2: Creating skin objects.
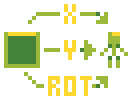
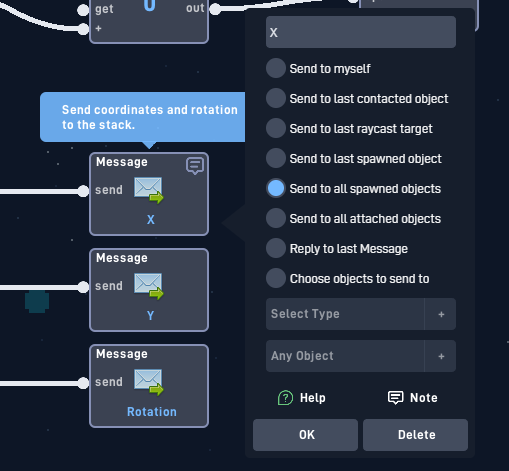
In flowlab, to make a skin and hitbox object, all you need to do is communicate the necessary information about the hitbox object to the sprite object so it can reflect where the hitbox object is. This means transmitting X and Y coordinates, and sometimes rotation, size, being flipped upside down, etc.
For this example, let’s have the wizard hitbox communicate the X and Y to the wizard sprite.
The code inside the wizard hitbox will look something like this.
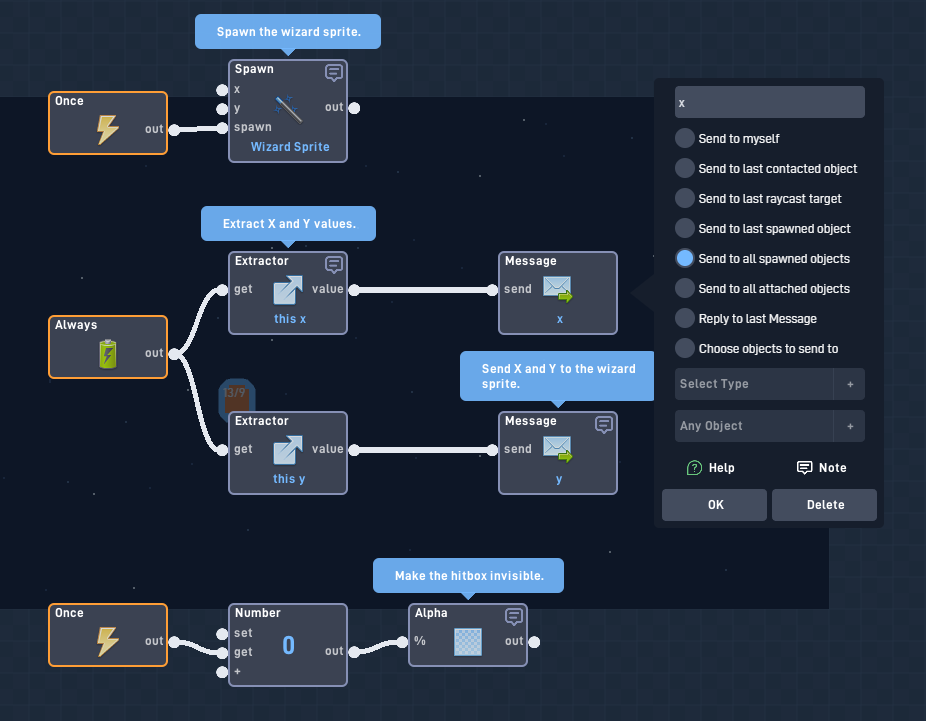
This code spawns in the wizard sprite, and then repeatedly sends the sprite it’s X and Y values. It also makes the hitbox object invisible.
Meanwhile, the code inside the wizard sprite will look something like this:
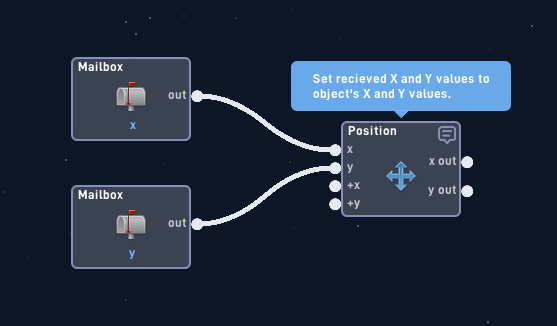
This code receives the X and Y values and applies them to the sprite object.
Wait! Why are we communicating the X and Y values to the sprite with messages? Why not just use globals?
The reason why is because the globals method is incompatible with multiple objects. If we placed down multiple wizards, then they would all be sending different X and Y values to the same “wizard X/wizard Y” global. Using messages eliminates this issue.
If you are already communicating the player’s X and Y using globals for some other reason however, then you can use a global. Just never use it for things like enemies where multiple objects will be present in the level.
If you need to communicate more values to the skin object, like rotation or size, you can just use the same method used to transfer X and Y values to the skin object.
0.3 Skin object examples.
Here are some examples when you might want to use a skin object instead of letting flowlab draw your object’s hitboxes.
A spaceship enemy is a very common object in a game, and the hitbox shape would be needlessly complicated.

A tree exists in a game, but the player should be able to pass through the leaves.

An object has a glowing aura that the player should be able to pass through

Chapter 1: How to spritestack!
Fabricating the illusion of 3D in 2D!

1.1: What exactly is a spritestack?
A spritestack is a chain of skin objects (objects with no physics that serve as the visible part of another object) that are layered on top of each other in a “stack”. Each object up the stack has a slightly higher Y offset, and a higher display value.

When the hitbox or base object rotates, all of the sprites in the stack rotate. Because of the offset, it causes the stack to look like it’s imitating a 3D object being seen at an angle, even though all it is is multiple similar objects being layered on top of each other.
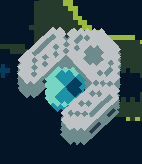
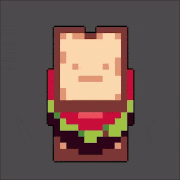
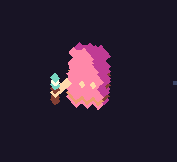
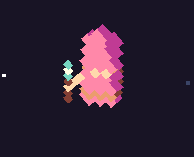
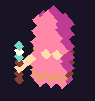
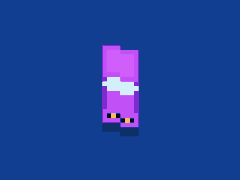
The spritestacked player in envoy, holding a gem.
An example of what a stack looks like when rotating, found on medium.
1.2: How to create a spritestack.
To create a spritestack, all you need is a base object to anchor the stack to, and an object to store the animation frames for the stack and to act as said stack.

Let’s create a hitbox object for our wizard player, and a stack object to store the sprites that are going to be stacked.
For this example we are going to use the behavior bundles from @JR01’s sprite stacking example. I highly recommend this one, since it is easy to understand, very modular, and doesn’t contain any trigonometric jargon like some of his other bundles (no offense JR, we all love the bundles you make and they are amazing).
Before we lay out what the code will look like, we need to plan our stack first.
Because we are making a wizard, we need enough layers for a robe, a head, and a hat. For this plan, let’s dedicate 4 layers to a robe, 2 layers to the head, and 4 layers to the hat. That means 10 total layers.
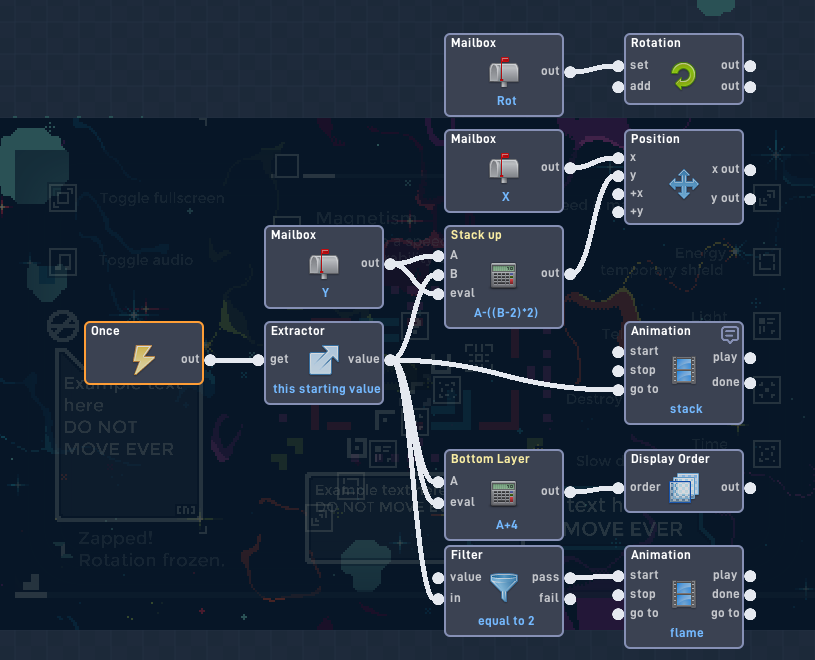
The code inside the Wizard hitbox will look something like this:
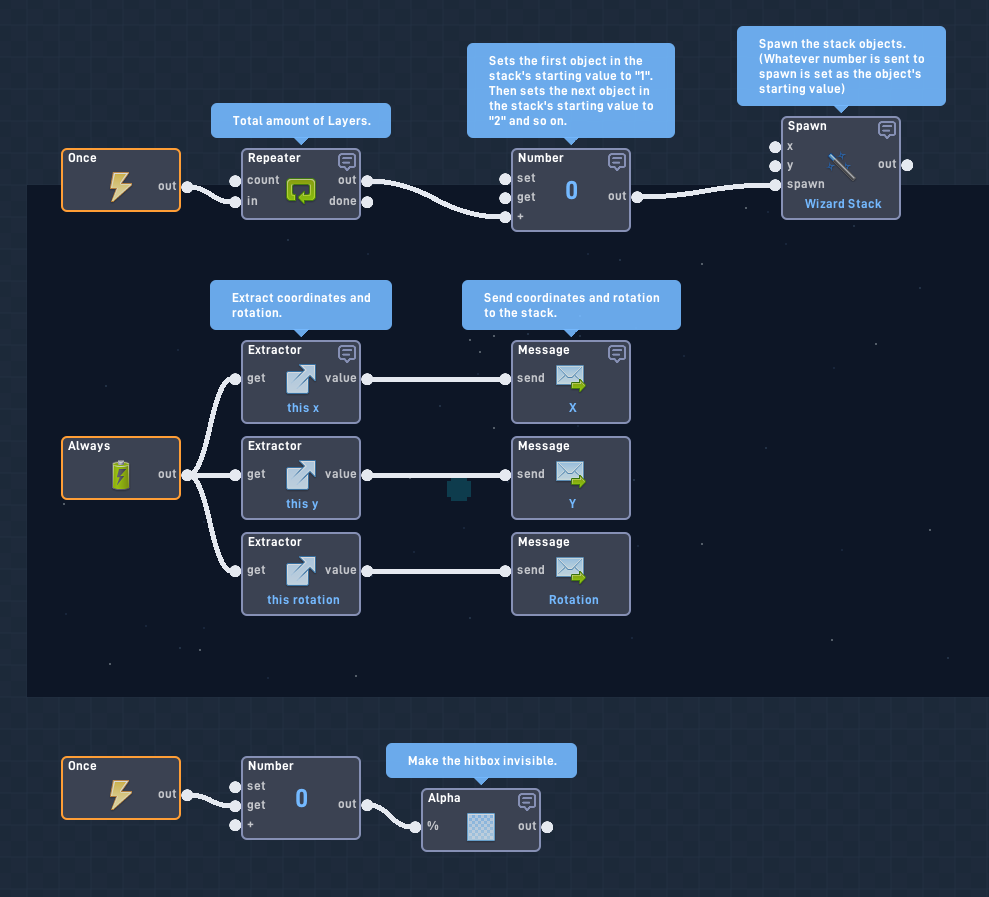
This code spawns the stack objects and sets their starting values as it spawns them. It also will send objects in the stack it’s X-Y coordinates and its rotation. Finally it will make the hitbox object itself invisible.

Because we are setting up this spritestack, we are going to make sure that the amount of layers is correct,
…and that the values are being sent to the stack objects.
Meanwhile, the code inside the Wizard stack will look something like this:
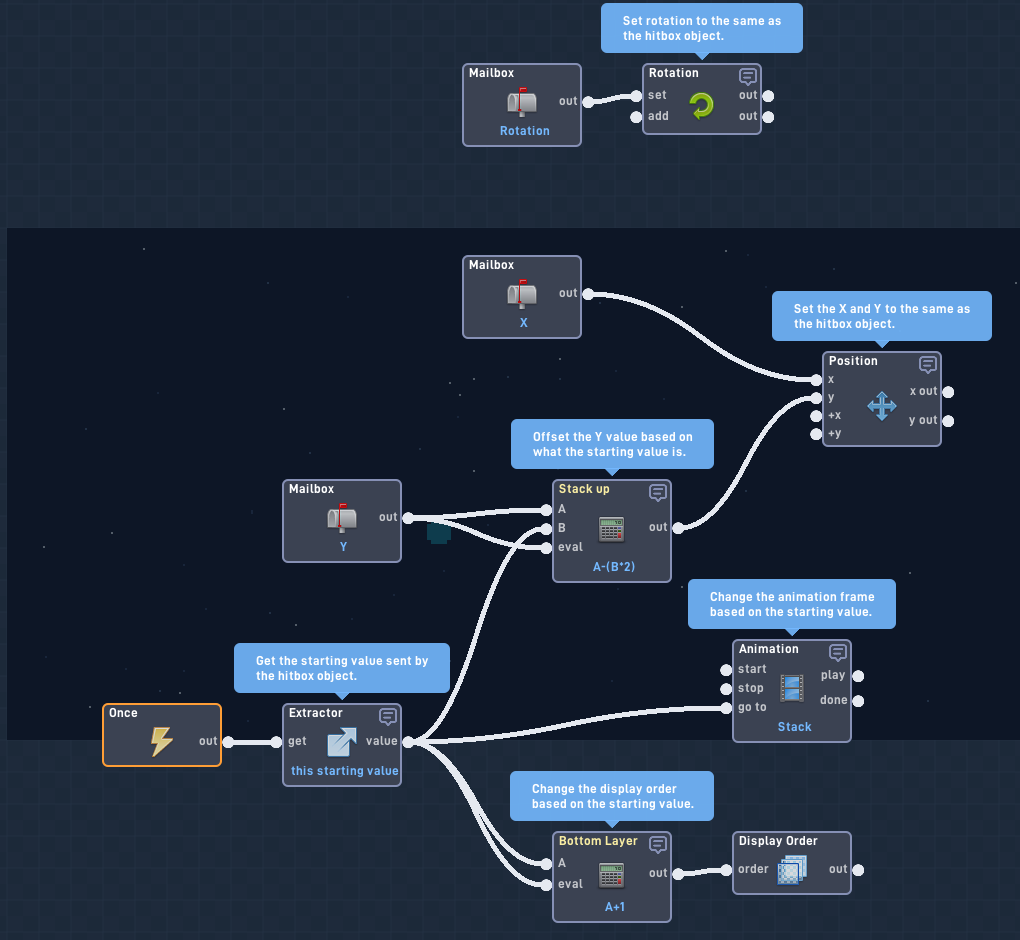
This code will cause the stack objects to take the information given by the hitbox object. It will then use said information to properly follow the hitbox object.
However, the Y offset, animation frame, and display order will all be affected by the starting value.
Wait! What is all this talk about the starting value?
“Starting value” is a value sent to an object by what spawned it. In flowlab, whatever number travels to the “spawn” input to spawn the object will become that object’s starting value.
Starting value, in this context, is how the hitbox object tells the stack objects what layer of the stack it is.
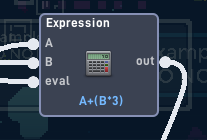
So let’s write out the values that some stack objects have based on their starting values.
Layer. Starting value: 1
Display order: 2
Animation frame: 1
Y offset: -2 NOTE: Y value is inverted in flowlab, so negative is actually upward. Ask grazer why.
Layer. Starting value: 2
Display order: 3
Animation frame: 2
Y offset: -4
Layer. Starting value: 3
Display order: 4
Animation frame: 3
Y offset: -6
The expressions used in the image above are to correctly apply these values to the stack objects so that they are correctly displayed on top of each other, are set to the right frame, and have an offset so that they appear to be stacked on one another.
Finally, let’s make the layers. For this example, we’ll change the size of a circle throughout the layers to create the shape of a robe and then a hat, with a head in between. We’ll also have the wizard holding a staff with one hand.
(Chapter 2 is full of how to do this more easily in detail)

4 layers for the robe, 2 for the head and 4 for the hat. Just as planned.
And now, all we need to do is rotate the hitbox object ingame by a few degrees and…
PREST- oh. Our wizard is looking quite flat and pancake-y.
Fortunately, the distance between the sprites in the stack can be adjusted by changing this number within the Wizard stack object. The number being edited here is essentially the pixel distance between each stack layer.
Looking better!
You might notice something, though. Our wizard looks really… strange?? It’s extremely obvious that it’s a spritestack, and not a 3D object.
When making a spritestack, you are going to need to deal with trial and error. When it comes to this sort of thing, objects often look better in your head than in front of you. Anyways, here is the spritestack after being cleaned up:

To get this result, I doubled every single frame in the animation and set the offset back to 2 pixels. While it still looks a bit weird zoomed in like this, when in regular fullscreen, at it’s size the wizard will look normal.
This is by far the longest segment of the guide. If you have any questions about this, please feel free to ask me, since I know it can be a lot to take in at first!
1.3: Camera angles & understanding when to spritestack.
Most two-dimensional games have three distinct “camera styles”. They are 2D, top down, and bird’s eye.
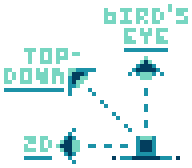
Put simply, 2D is looking at something from the side, bird’s eye is looking at something from overhead, and top-down is between the two: looking at something from overhead, but at an angle.
Every spritestack is viewed in top down, no matter what. If you viewed the stack from bird’s eye, you would only see the top of the stack, and if you viewed it from 2D, it would look like a regular 2D image, even when rotating.
If you want to add spritestacking to any current project of yours, be sure to make sure that the camera angle is the correct one before doing so. If your game isn’t top-down and you don’t make the game arranged that way, you’ll end up with something that looks really weird.
You can also transcend camera angles completely. But if you’re doing that, you probably don’t need to be reading this guide.
1.4: Spritestacking examples from the internet.
Here are some neat examples of pure spritestacking, found from the internet.
A whole spritestacked world with a few flat elements, found on artstation. Reminds me of a certain magic game…
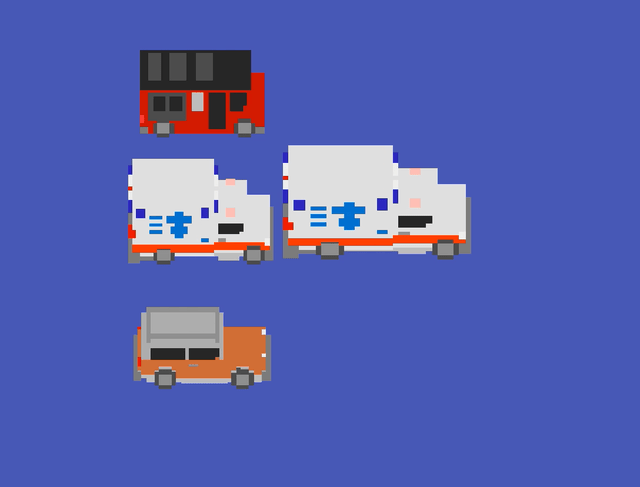
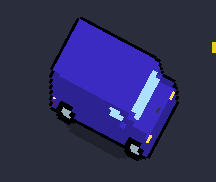
Some cool spritestacked vehicles found on a construct thread. Vehicles are probably one of the best and easiest things to spritestack.
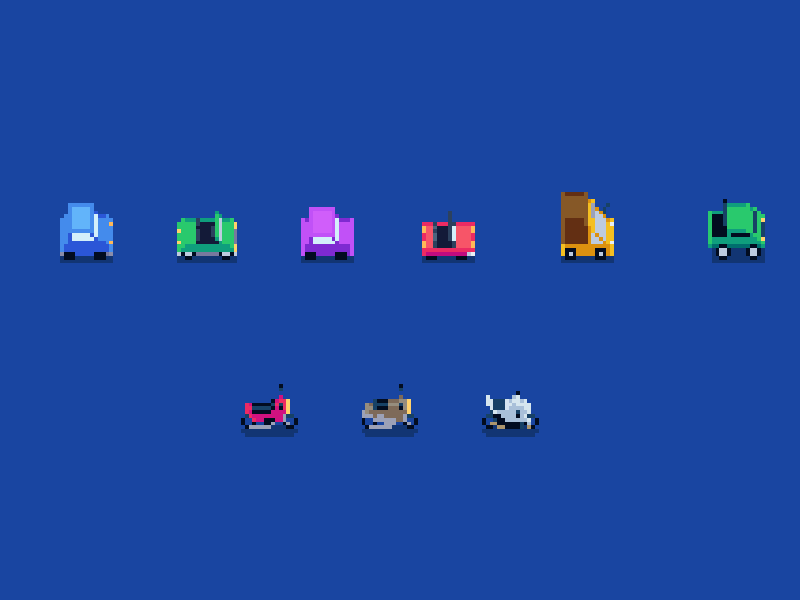
Multiple spritestacked vehicles and bikes found on itch. Pixelate is a common filter used on a lot of spritestacked games, to make the stacking less obvious and feel more authentic.
Chapter 2: Spritestacking tips & tricks!
How to make better looking and more efficient sprite stacks.

2.1: Recommended software
Making a spritestack is completely possible within flowlab’s editor. However, there are plenty of tools out there that you can use to make creating your stack easier before it’s actually implemented into the game. Here is a list of some which I highly recommend.

Aseprite: Pixel art editor. ($20)

Pretty much the industry standard pixel art editor. It’s got lots of functionality, lots of charm, supports all sorts of things, and is easy to use (unless you’re using a trackpad at the moment). It also supports animations, which will allow you to send your stacks to other game engines after you’re done.
Libresprite: Free aseprite. (free)

A free alternative to aseprite, with a few less features. This exists because Aseprite used to be open source, and when it was taken off open source, some people adopted the original open source version and worked on it themselves. It is completely free and legal to use.
Stacked sprite viewer: Spritestack visualization tool. (free)
A simple and really good visualization tool. You just drag a horizontal spritesheet into it, tell it the dimensions and boom done. It has a few limitations: the object can’t be larger than 99x99 and you get only two settings for distance between sheet layers. But it is still a great tool that comes with outline and shadow options, a pixelize toggle and a few other cool features. I used this tool to help model the sprite sandwich at the top of this tutorial, and I highly recommend it!
Spritestack.io: Super-advanced but ![]() Abandoned voxel/sprite editor, animator, renderer & more. ($20)
Abandoned voxel/sprite editor, animator, renderer & more. ($20)
I haven’t used this tool before. However, I’ve seen it a lot and it looks like it has a boatload of features. However due to that, the software is also abandoned, so VOX models can’t be exported. If you interact with whatever community is still there, they can probably figure out if spritestack is good for you or not. But with all of that out of the way, it seems like a very versatile and powerful suite to work with.
2.2: Efficiency I: Communicating to the spritestack.
For a spritestack to work, the hitbox object needs to communicate with the stack constantly about it’s X and Y position, rotation, and sometimes other factors like size.
One way we can make spritestacking less taxing on the processor is by only sending the necessary information when it needs to be sent. Especially when it comes to multiple stacks like groups of enemies, only communicating info when it’s needed will make the game use the processor much less.
Here are some examples:
- You have a spritestacked player that can move around. When the player is standing still, X and Y values do not need to be sent to the stack, so don’t send X and Y values to the stack while no movement keys are being pressed.
- There is a spritestacked tree in your game. Since the tree cannot move and is a decoration, only communicate the hitbox X and Y to the stack once when it spawns, and then never again.
- Spritestacked asteroids are in your game but they only rotate when in view to save performance. Only communicate the rotation to the stack when the asteroid is rotating.
- You have enemies with guns that are spritestacked in your game. The guns “squish” when shooting for extra effects. Only communicate the X and Y size values to the stack when the squish animation is playing.
Especially in the flowlab game engine, the less you repeat stuff constantly, the better. You can actually make a really huge spritestacked world in your game, as long as you only communicate information when it is needed.
2.3: Efficiency II: Physics settings.
This tip only applies to the flowlab game engine.

Any spritestack object that exists should always have all physics settings disabled.
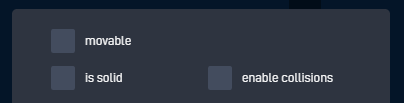
This includes movable. Why? If any physics settings are turned on, the physics engine will observe them, even if they don’t have any collisions of any kind. “Movable” is a setting that dictates if we can use behaviors like velocity and impulse, and since these stack objects are mimicing the hitbox object with X-Y coordinates, there is no reason to have “movable” enabled. Turning off all physics settings will cause the physics engine to forget it exists, and when you have hundreds or even thousands of spritestacked objects, it becomes a requirement to do this very, very quickly.
For example, when I was making Envoy, an asteroids-like physics space game, I tested this out, and these were my results:
All stack object having movable enabled:
![]()
All stack object having movable disabled:
![]()
2.4: Layering properly.
Figuring out the distance between your stack layers is very important. It is a delicate balance between stacks looking smooth but using up performance vs. stacks being performance friendly but looking weird when rotated.

When stacking, be sure to experiment with how far apart your layers can be before they look weird. Being able to use less layers for more distance is always a plus, but it’s also equally as important to make sure your sprites don’t look strange.

As mentioned earlier, a good way to make things look smoother and better is by doubling the amount of slices if needed.
2.5: Setting up layering conventions.
If the game you are building is going to have multiple spritestacks, then it is extremely important to set up a layering convention. This means figuring out what display layers should be used by certain objects.
For example, let’s say you’re building a game where a player walks through a maze and there are helicopters flying overhead. You want the helicopters to always fly above the maze, so you would make a plan to have the helicopters show up on different layers than the layers the player and maze are on.
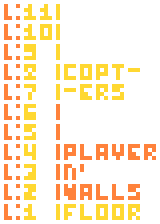
If you want to have multiple layers for the floor to add detail, all you’d need to do is add more layers to the floor segment in your plan:

I would strongly reccomend something like google sheets or docs to plan this out before you start stacking your game, since modifying the entire game for something like this would be a real hassle. But once you buckle down and do it, future you building the game will be very appreciative of you!!
2.6: Light sources
There are tons and tons and tons of light source art tutorials out there, and you probably know what they entail. But if you don’t, basically when shading anything, you need to take into account where the light is coming from.

Since spritestacking is spritestacking and NOT 3D modelling, you cannot * create a lighting engine like you would for a 3D game. So shading your spritestack correctly is important.
In the vast majority of cases, it’s best to have the sky as a light source. This means shading everything as if it’s outside during noon, i.e. with a light overhead.

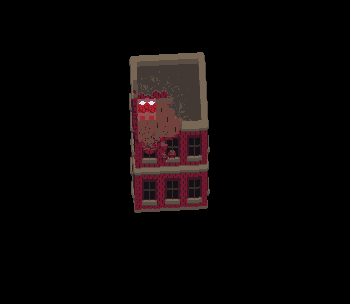
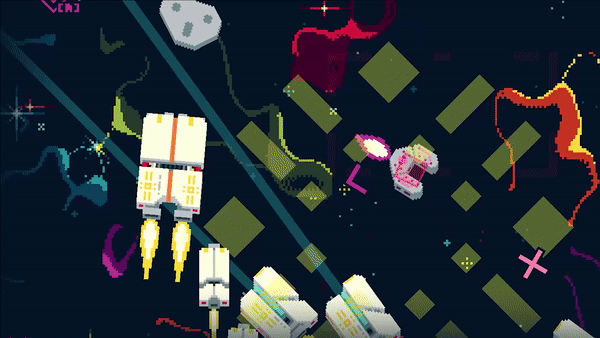
Enemies and the player in Envoy (before thrust trails were added).
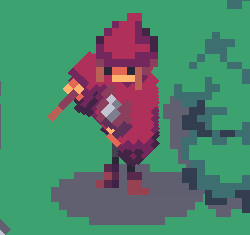
The player from Witch in the woods. Note that the cloak is stacked, but not the legs nor head.
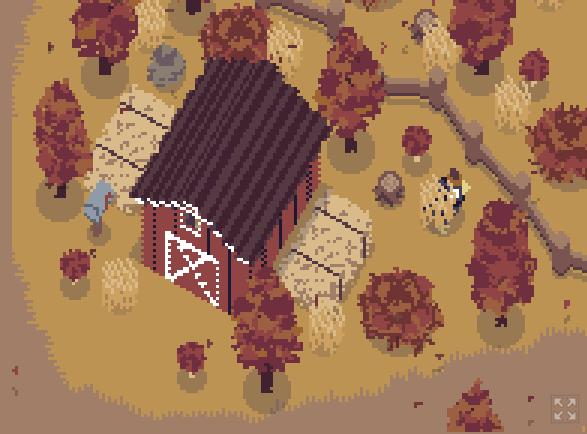
An entire environment shaded from the sky, with shadow effects added for a barn in Feather park.
2.7: Animations
Contrary to popular belief, animating spritestacks is possible. There are two methods that are somewhat forgiving to memory that I have found, so we’ll go over them. Fortunately, we can yet again use Envoy as an example here.
Method A: animating one layer
The first method is making all of the frames static, but having one layer be animated.
For example: All enemies in Envoy have thrust trails, but they only actually appear as one layer.
*gif is slowed down lol
To do this, one layer of the spritestack is actually running on a completely separate animation. Inside the editor for the stack object, there are two animations: one for the stack, and one to run the thrust trail effect.
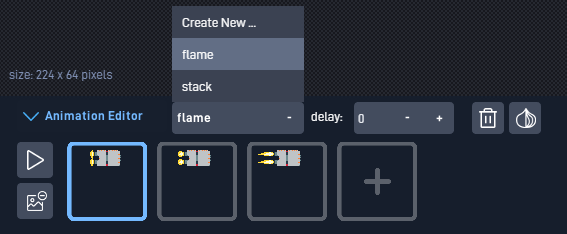
This animation is a modified version of the second layer in the spritestack, with a thrust effect added.
Meanwhile inside the code, the object will turn on said thrust trail effect if it is assigned to the second layer.
The flame animation has a higher display priority than the stack animation.
This way, an extra effect can be applied to the stack without the need to create a new object. This can be good for simple effects where only one layer is needed. But if you want to animate on multiple layers, you’ll need to use method B.
Method B: arrays of frames
The second method is changing all of the layers at once using arrays of frames. For example this means turning a plastic chair from green to purple, making a face happy to angry, or making a door appeared opened or closed.
For example:
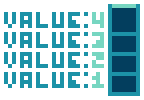
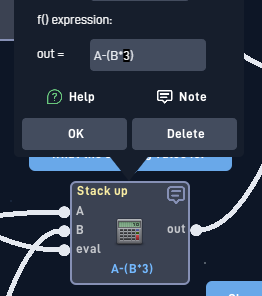
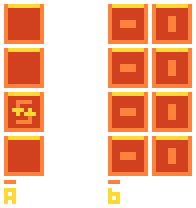
In Envoy, the monolith at the center of the map has five crystal slots, which appear to hold the crystals when retrieved. This is what the spritesheet for one of the crystal slots looks like:
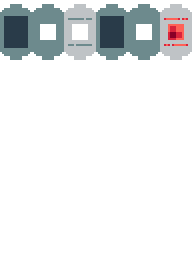
When the second gem (red) is placed into the monolith, the stack object for the crystal slot will add 3 to it’s starting value, shown here:
A = starting value. B = 0 if the crystal is not in the slot, or 1 if the crystal is in the slot. The output sends the new number the frame should be to the animation block.
This will cause layer 1 to use frame 4, layer 2 to use frame 5, and so on. You can do this with as many variants as you’d like. The player in envoy has a whopping 11 variants, but the math behind it is a little more complicated, so I left it out.
Conclusion.
First off, to get it out of the way: I hope you learned a thing or two about spritestacking, how it works, or how to perfect it while reading this guide! It was a lot of fun to make, and I’m very proud of it.
The best way to learn is by practicing.
Everything, especially the tips and tricks section, are things I have done myself and thus know how they work. While it is nice to know how to do something, actually doing it allows you to train yourself. This goes for anything in game development beyond spritestacking.
Stacking will also be annoying and difficult at first, but once you get it down it’ll be like second nature when programming it. I promise it’s not that hard.
Please ask me if you have any questions or thoughts.
I am more than happy to reply to others and help elaborate on things covered by this guide. And if you think a section could be explained better or was tough to read, let me know! I would like to keep this guide maintained for at least a year into the future.
Go out and experiment!
Spritestacking hasn’t been around for all that long, and there are probably a bunch of cool things nobody’s done yet. It’s not a very explored frontier, especially on the flowlab website, so I strongly encourage thinking up ways to do things and trying them out!
There are a few cool things you can do with spritestacking that I didn’t cover in this guide, like outlining sprites or using the pixel effect to cover up blemishes and make them look more like genuine pixel art.
Thanks for reading!
